Check a Mac for malware with a reversible diagnostic route that separates ordinary symptoms from persistent changes, trusted detections, and account impact.
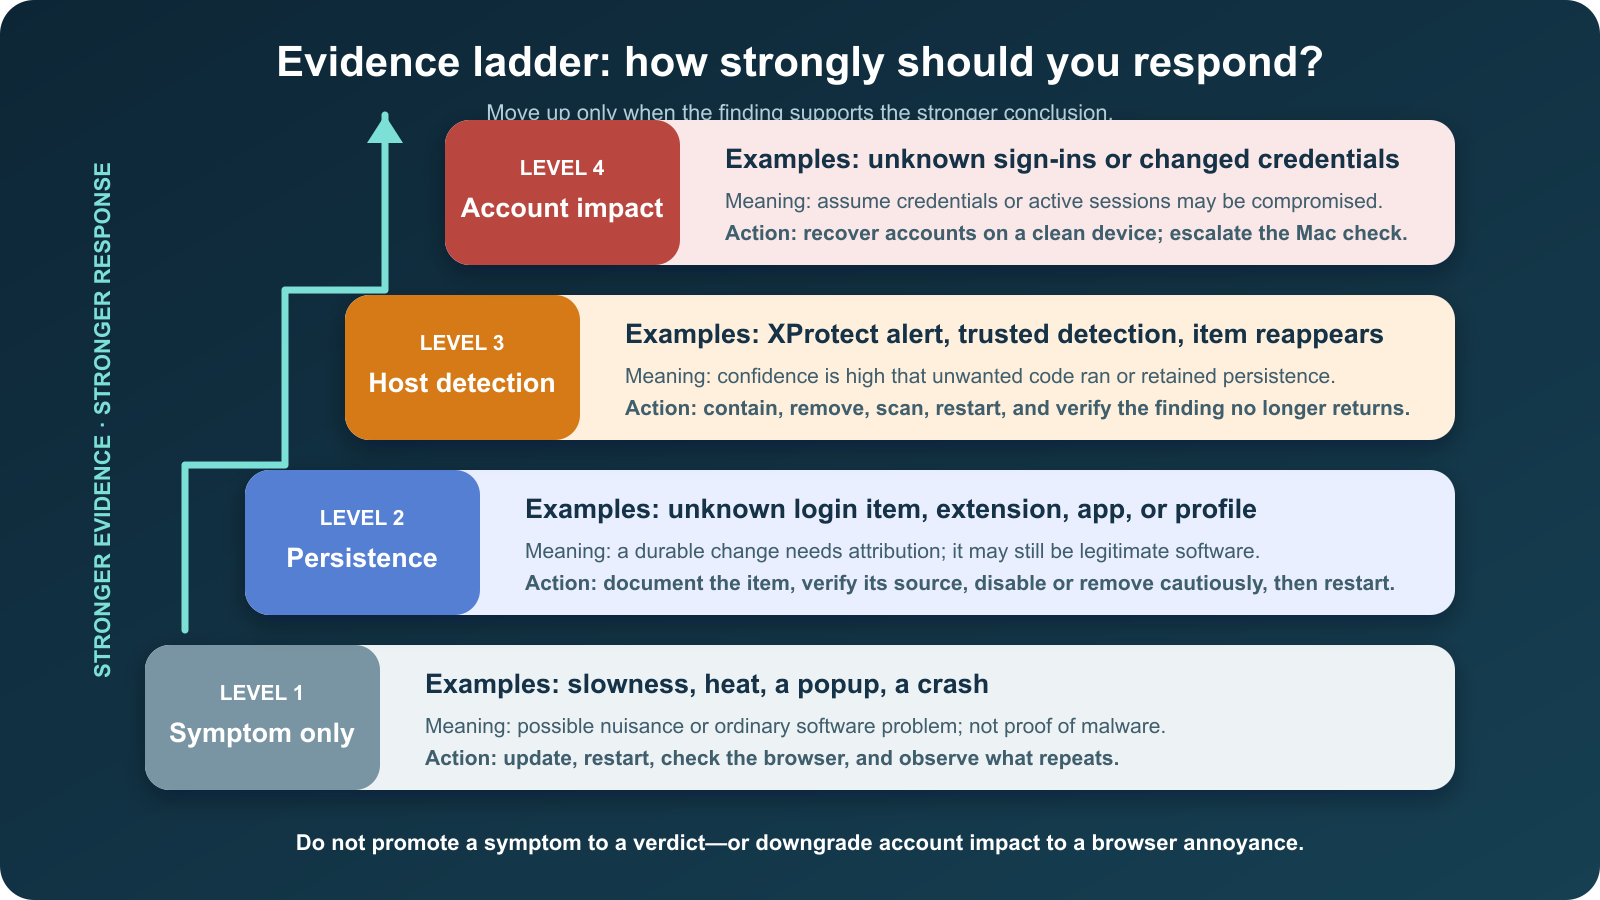
To check a Mac for malware, update macOS and restart, then review login items, background extensions, browser permissions, installed apps, running processes, and configuration profiles. Treat an unfamiliar name as a lead—not a verdict. A persistent item, a trusted security detection, remote control, or unrecognized account activity is stronger evidence and calls for a stronger response.
Start with the least destructive checks below. Do not paste Terminal commands from a popup, delete system files by name, or install a “cleaner” advertised by the alert you are investigating.

First decide whether you need to contain an active incident
Ordinary slowness, heat, crashes, and browser popups can come from legitimate software, a busy tab, low storage, or an unwanted extension. They justify a check but do not prove infection. Disconnect the Mac from networks only when you see a live, consequential event—for example, files being encrypted, the pointer moving under someone else’s control, a password changing without you, or an unknown sign-in appearing while the Mac is in use.
If the concern is only a suspicious popup, take a screenshot, close the tab or browser, and continue the checks. If money, work accounts, health data, or administrator access may be affected, stop using the Mac for sensitive activity and contact the relevant bank, employer, or IT team from another trusted device.
| What you observe | What it proves | Best next move |
|---|---|---|
| One popup, a hot Mac, a crash, or temporary slowness | A symptom only; it may be an ordinary app or browser problem. | Update, restart, inspect the browser, and record whether it repeats. |
| An unknown login item, extension, app, or management profile | A persistent change that needs attribution; it may still be legitimate. | Document the name, developer, path, and install date before disabling it. |
| An XProtect alert, a finding from a trusted scanner, or an item that returns after removal | Stronger host evidence that unwanted code ran or retained persistence. | Contain, remove using a verified method, restart, rescan, and verify. |
| Unknown sign-ins, changed credentials, remote control, or unauthorized charges | Possible account or session compromise even if the Mac’s root cause is unknown. | Recover accounts on a clean device and escalate the Mac investigation. |
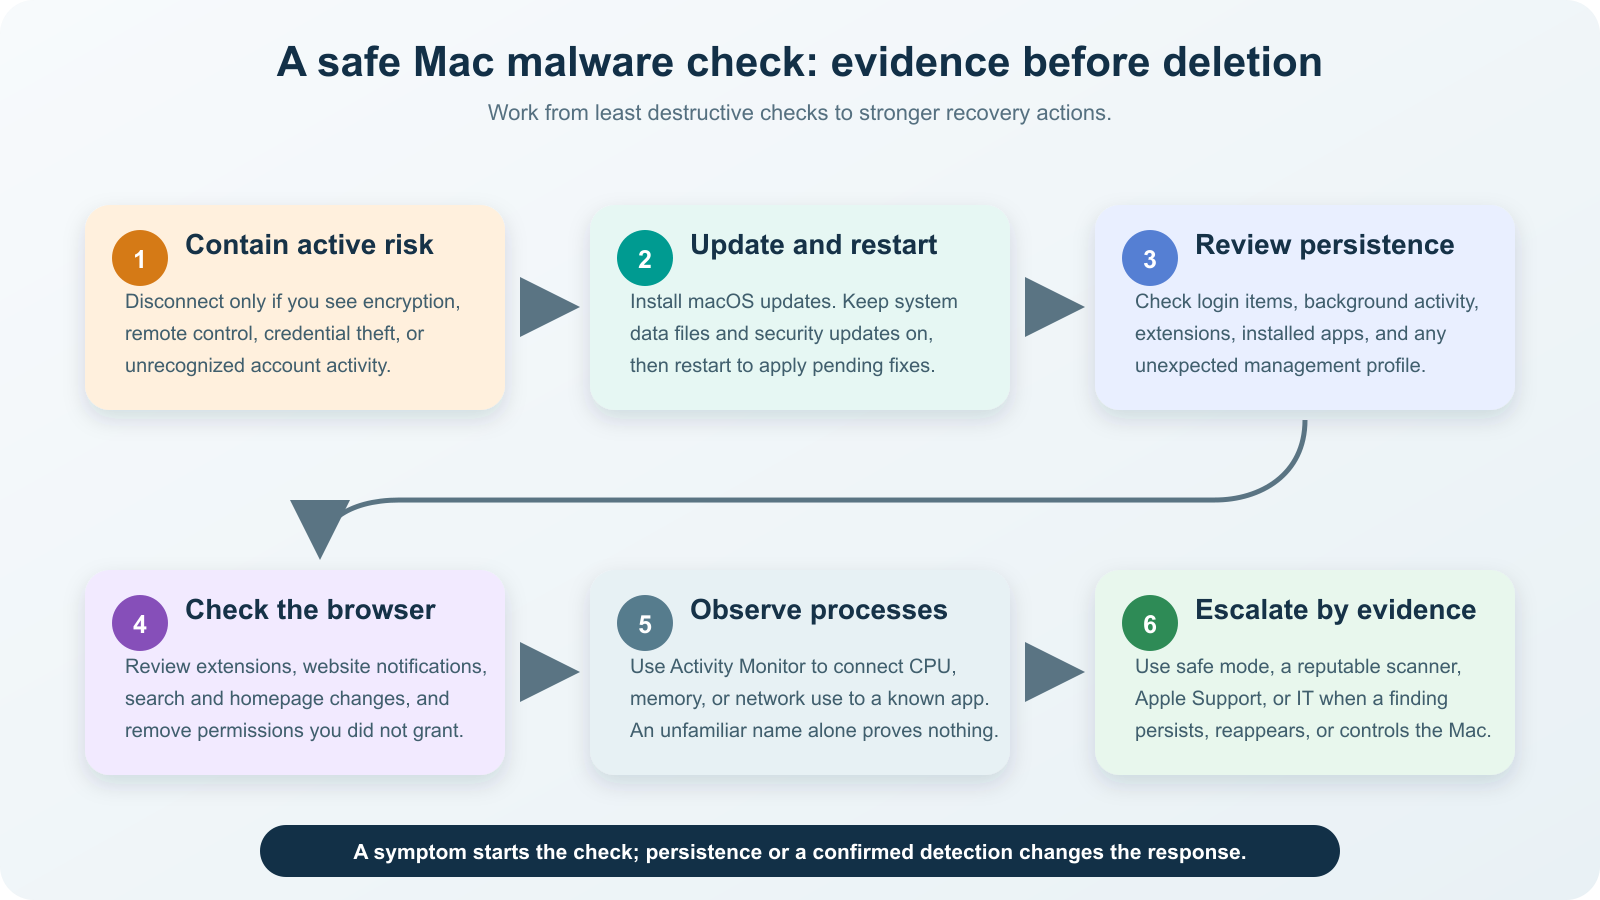
Follow this six-step Mac malware check
1. Update macOS, security data, and apps
Save open work, install the current macOS updates offered to your Mac, update apps from their official source, and restart. In System Settings → General → Software Update → Automatic Updates, keep the installation of security responses and system data files enabled. Apple says these background updates include XProtect data and other security configuration, and some take effect only after a restart. Menu names can vary slightly by macOS version.
macOS already has layered protections. Apple’s Platform Security guide describes Gatekeeper and Notarization as preventive layers and XProtect as built-in malware detection and remediation. XProtect updates automatically; it is not a user-facing app with a “scan now” dashboard. Seeing no alert therefore is not, by itself, proof that every file is safe.
2. Review what starts or persists
Open System Settings → General → Login Items & Extensions. Review apps that open at login, apps allowed to run in the background, and extensions. Apple’s Login Items & Extensions guide explains the controls and notes that extensions can add functionality across macOS.
For each item you do not recognize, write down its exact name before changing it. Check whether it belongs to software you intentionally installed, your printer, cloud storage, VPN, accessibility tool, or employer. Search the developer’s official site—not the first sponsored result—for the component name. Disable a questionable login or background item, restart, and see whether the symptom and item return. Prefer the app developer’s official uninstaller when an app installed system extensions or support components.
Also inspect Applications, sorting by date if that helps you reconstruct what changed. An old modification date does not prove an app was present that long, and dragging a complex app to the Trash may leave its approved helpers behind. The goal is attribution, not the largest possible deletion list.
3. Check configuration profiles without breaking management
Search System Settings for Device Management or Profiles. A profile can legitimately configure networks, certificates, accounts, restrictions, or security settings. An unexpected profile on a personal Mac deserves investigation because it can create durable configuration changes.
Do not remove profiles from a work- or school-managed Mac on your own. Apple’s Device Management guidance notes that some profiles are installed by administrators and may not be removable by the user. Photograph or record the profile name and organization, then ask IT to verify it.
4. Audit the browser separately
A browser can behave badly while macOS itself remains uncompromised. In every browser you use, review:
- extensions you did not install or no longer need;
- websites allowed to send notifications;
- changes to the homepage, startup pages, and default search engine;
- downloads or apps installed shortly before the problem began.
For Safari, choose Safari → Settings → Extensions; Apple recommends using the App Store or the extension developer’s site and keeping extensions updated. Its Safari extension guidance also explains how to turn an extension off or uninstall it. In Safari → Settings → Websites → Notifications, deny or remove sites you do not trust. A website notification can imitate a system warning, so never call a phone number or install software from the notification itself.
5. Use Activity Monitor to connect behavior to an app
Open Activity Monitor and watch the CPU, Memory, Energy, Disk, and Network views while the symptom occurs. Apple’s Activity Monitor guide explains these categories and how to inspect processes. Sort a column to identify which process is actually consuming resources, then use the process information window to gather details.
A strange process name proves almost nothing on its own: legitimate macOS services often have technical names, and malware can use a familiar-looking name. Record the process name, parent application if visible, user, resource pattern, and the action that triggers it. If force-quitting it stops the symptom, that is useful evidence—but verify what owns the process before deleting anything.
6. Escalate when the evidence persists
If a questionable item returns after restart, behavior continues in more than one browser, or a trusted alert identifies a file, run a reputable Mac security scanner downloaded directly from its developer or the App Store. Use one scanner at a time, update its definitions first, and save the report. A detection name, file path, and timestamp are far more useful than “my Mac feels slow.”
You can also test in safe mode. Apple says safe mode can help identify whether an issue is caused by software that loads as the Mac starts. If a symptom disappears there, startup software becomes a better lead; that still does not identify malware by itself. If the evidence concerns a company Mac, administrator account, or recurring system extension, take the finding log to IT, Apple Support, or a qualified incident responder.
Keep a finding log so the check is reproducible
Create one row whenever you find something questionable. This prevents a loop of deleting, forgetting, and rediscovering the same item:
| Field | What to record | Why it matters |
|---|---|---|
| Time and trigger | When the symptom appeared and what you were doing | Separates repeating behavior from a one-off event |
| Exact item | Process, app, extension, profile, notification site, or detection name | Allows reliable attribution instead of guessing from an icon |
| Location and owner | File path, developer, signing information, or managing organization | Distinguishes an app component from an unexplained copy |
| Action taken | Disabled, uninstalled, scanned, updated, or left unchanged | Makes the result reversible and auditable |
| Verification | What happened after restart and whether the item returned | Confirms outcome instead of assuming removal worked |
Remove findings carefully, then verify
When you can attribute a finding, remove it at the layer where it lives: revoke a website’s notification permission, uninstall the extension in the browser, disable an unknown login item, or use the vendor’s documented uninstaller for an app. If a trusted scanner quarantines a file, preserve the report and follow its restart or rescan instructions.
After removal, restart the Mac and repeat the same trigger that produced the symptom. Recheck the login item, extension, profile, process, or scan result. A clean verification means the item stays absent and the associated behavior does not return—not merely that the first warning window closed.
Back up important user documents before major recovery work. Our computer backup guide explains how to separate backup creation from restore testing. Avoid copying unknown installers, browser profiles, or questionable applications into a clean backup set.
Recover accounts separately from cleaning the Mac
If you see an unknown Apple Account device or sign-in, an unrequested two-factor code, credentials that no longer work, or settings you did not change, use a different trusted device to recover the account. Apple’s compromised Apple Account checklist recommends changing the password, reviewing personal and security information, and removing devices you do not recognize.
Repeat that process for affected email, password-manager, banking, social, and work accounts. Revoke active sessions where the service allows it, replace reused passwords, and strengthen sign-in with a passkey or phishing-resistant multi-factor method when available. Cleaning a Mac does not automatically invalidate a stolen browser session, and changing a password on a still-controlled Mac can expose the new password.
When an erase and reinstall is reasonable
Erasing a Mac is not the first diagnostic step. It becomes reasonable when trusted evidence shows persistent compromise, administrator-level tampering, unexplained remote control, or recurrence after verified removal—or when an organization’s incident-response policy requires it. Apple documents how to enter macOS Recovery on Apple silicon and Intel Macs. Get Apple or IT help if you are unsure which data can be safely restored.
Before erasing, preserve the finding report, record affected accounts, and make a current backup of known user documents. After reinstalling, update macOS first, restore documents in controlled groups, and reinstall apps from verified sources. Restoring every old app, extension, profile, and browser state at once can also restore the condition you were trying to remove.
A safe stopping rule
You can stop the active investigation when updates are current, no unexplained persistence remains, the original behavior cannot be reproduced after restart, and any scanner result is clear on a verification pass. Keep the finding log for a few days so you can connect a recurrence to the earlier event.
Escalate instead of improvising when the Mac is managed, the finding has administrator privileges, files are encrypted, accounts or money are affected, or the same item returns. The useful question is not “Can I find a scary process name?” It is “What changed, who owns it, does it persist, and what evidence shows that the response worked?”