Take a full-screen, window, or region screenshot on Mac or MacBook. Choose a file or Clipboard, find missing captures, and prepare a readable attachment.
To screenshot on Mac, press Shift-Command-3 for the entire screen, Shift-Command-4 for a selected area, or Shift-Command-4 and then Space to capture one window. Press Shift-Command-5 when you want the Screenshot toolbar, a timer, a different save location, or screen recording.
By default, a still screenshot is saved as an image file on the desktop. Add the Control key to a screenshot shortcut when you want the result on the Clipboard instead, ready to paste into a message or document. Before capturing, close notifications and remove any personal, customer, financial, or account information that the recipient does not need.
Choose the capture result before you press the keys
The best shortcut depends on the result, not on which combination is easiest to remember. Use the smallest boundary that still communicates the point.
| What you need | Shortcut | What happens next | Best use |
|---|---|---|---|
| Entire screen | Shift + Command + 3 | Captures the full visible screen | Overall layout or evidence within the visible screen; not a scrolling webpage |
| Precise rectangular area | Shift + Command + 4 | Turns the pointer into a crosshair for dragging | Error message, chart, form field, or one UI region |
| One window or open menu | Shift + Command + 4, then Space | Turns the pointer into a camera and highlights the target | A clean app window without surrounding desktop clutter |
| Toolbar, timer, save location, or recording | Shift + Command + 5 | Opens the Screenshot controls | Repeatable captures, demonstrations, and screen video |
| Clipboard instead of a saved file | Add Control to the relevant shortcut | Copies the capture so you can paste it | Fast insertion into chat, email, notes, or a document |
For a quick memory aid, think 3 = screen, 4 = region or window, 5 = controls. Choose the boundary first, then choose a saved file or an immediate paste.
Take a full-screen, selection, or window screenshot
Capture the entire screen
Press and release Shift + Command + 3 together. A thumbnail may appear briefly in the lower-right corner. Click it to edit, drag it into another destination, or wait for the image to save.
A full-screen capture is quick but often reveals more than the reader needs: open tabs, names, clock and menu-bar details, notifications, or a second application. Prefer a selection or single window when the surrounding context is not part of the explanation.
Capture a selected area
- Press Shift + Command + 4.
- Move the crosshair to one corner of the area you need.
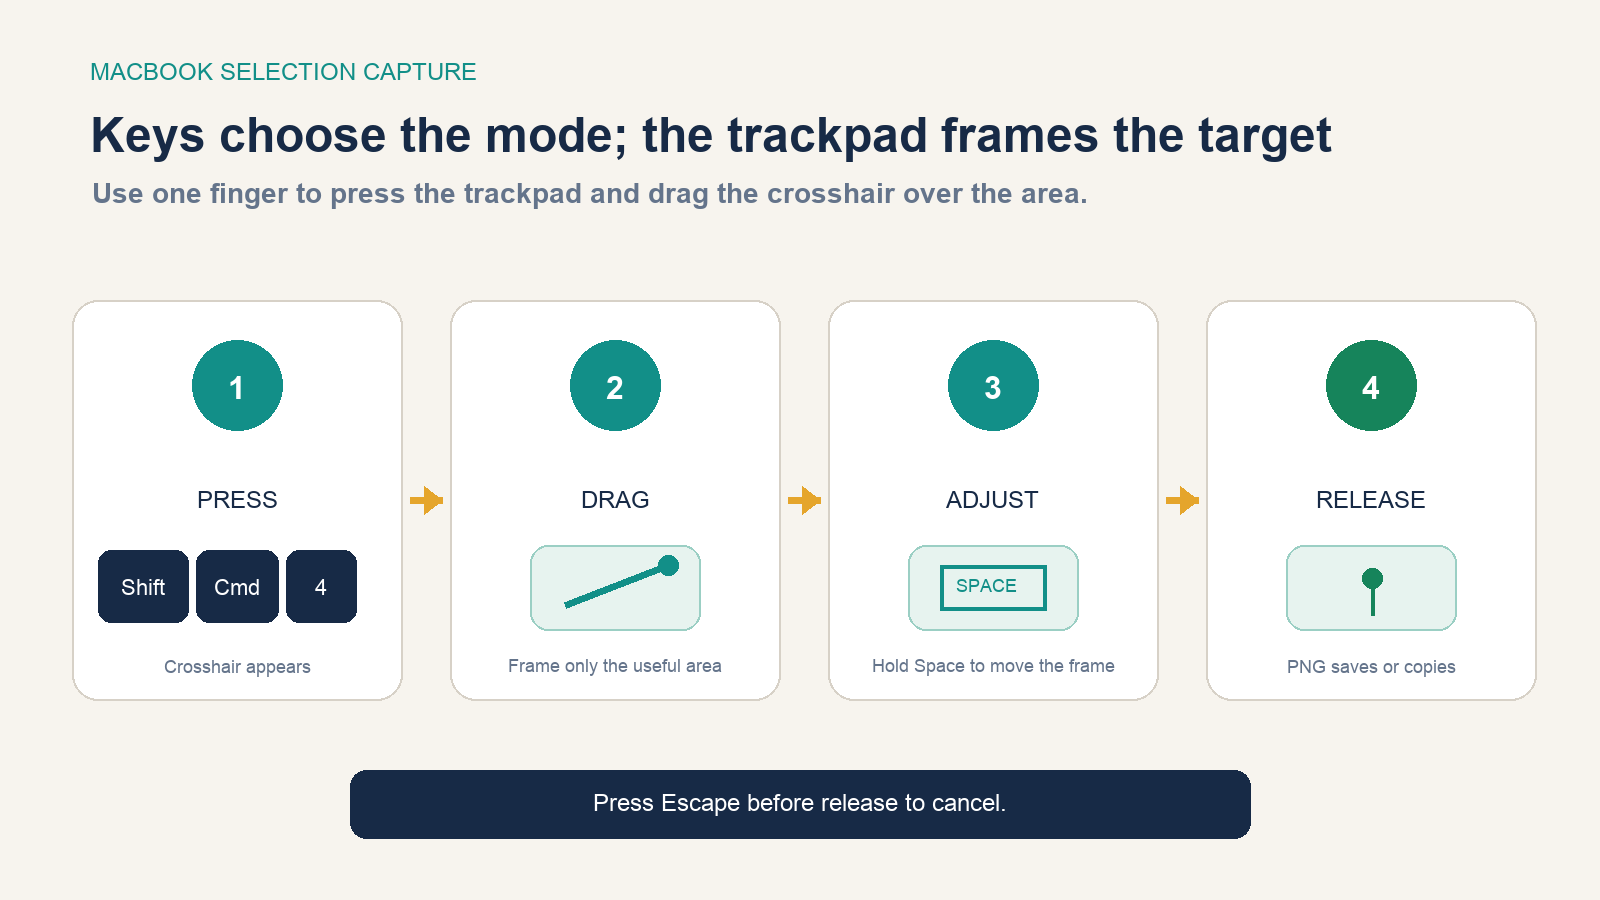
- Press and drag across the content. While dragging, hold Space to move the selected rectangle without changing its size.
- Release the mouse or trackpad button to capture, or press Esc to cancel.
Selection capture is usually the safest choice for support tickets, tutorials, and project updates because it removes unrelated desktop context before the image exists.
Capture one window or menu
- Open the window or menu in the state you want to show.
- Press Shift + Command + 4, then press Space.
- Move the camera pointer over the target until it highlights.
- Click to capture. Hold Option while clicking when you want to exclude the window shadow.
Apple’s current Mac screenshot guide documents these shortcuts, the Space-to-move selection behavior, Escape to cancel, and Option-click to omit a window shadow.
Adapt the shortcut to your MacBook setup
“SS” is shorthand for screenshot, not a separate Mac feature. A MacBook Air or MacBook Pro running macOS uses the same 3–4–5 shortcuts as a desktop Mac. Use the operating system you are actually running: a MacBook running Windows needs the Windows capture instructions.
Keyboard, trackpad, and external displays
With the built-in trackpad, press Shift-Command-4, then click and drag the selection as you would with a mouse. There is no additional screenshot gesture to learn. If a drag ends too early, cancel and retry; holding Space while dragging moves the frame without resizing it.
On an external Windows keyboard, the Windows-logo key normally corresponds to Command; custom modifier mappings can change that. Apple’s Windows-to-Mac key reference explains the mapping. When using an external monitor, move the target window to the intended display and capture that window or a selected region. Inspect the resulting file rather than assuming every connected display was captured as intended.
MacBook Pro with Touch Bar
On a model that actually has a Touch Bar, press Shift + Command + 6 to capture the Touch Bar itself. This is not a shortcut for the main display and does not apply to MacBooks without a Touch Bar. Apple lists it in the Mac screenshot controls.
Use the Screenshot toolbar for options and recording
Press Shift + Command + 5 when a basic still-image shortcut is not enough. Available in macOS Mojave 10.14 or later, the toolbar includes capture modes for the screen, a window, or a selected portion, plus recording modes for the full screen or a selected area.
- Select the still-image or recording mode.
- Adjust the frame if you chose a portion of the screen.
- Open Options and choose the save destination, timer, floating-thumbnail behavior, pointer visibility, or microphone for a recording.
- For repeated region captures, check Remember Last Selection in Options if it is available; recheck the frame before each capture.
- Select Capture for a screenshot or Record for video.
- For a recording, select the stop control in the menu bar when finished.
Still screenshots normally save as PNG files, while screen recordings save as MOV files. On supported Mac models running macOS Tahoe 26 or later, the Screenshot app may also offer an SDR capture in PNG or an HDR capture in HEIF. Use the most compatible option when the recipient’s software is unknown. Apple’s Screenshot and screen-recording guide describes the current toolbar choices.
Use a timer when the state you need takes time to arrange. Capture a still image for a fixed setting or error; reserve recording for a sequence that a single frame cannot explain.
Save a file or copy the capture to the Clipboard
Choose a saved file when you need to rename, archive, upload, or edit the image later. Choose the Clipboard when the screenshot belongs immediately inside another app and does not need to become a separate desktop file.
- Save the full screen: Shift + Command + 3.
- Copy the full screen: Control + Shift + Command + 3.
- Save a selection: Shift + Command + 4, then drag.
- Copy a selection: Control + Shift + Command + 4, then drag.
After a Clipboard capture, place the cursor in the destination and press Command + V. If no new file appears on the desktop, that may be the intended result rather than a failure. You can also Control-click the floating thumbnail and choose the available Clipboard action.
Edit and organize the result before sharing
When the floating thumbnail appears, click it to crop, add a callout, draw, or share. You can also drag the thumbnail directly into a document, email, note, or Finder window. If it disappears, open the saved file in Preview and use the Markup toolbar.
Preview provides a menu-driven capture route when you prefer not to use a shortcut: open Preview and choose File > Take Screenshot, then select the entire screen, a window, or a selection. The result opens as an untitled image in Preview, where it can be annotated and saved. Apple documents this alternative in the Preview User Guide.
Rename a screenshot for its job rather than leaving a long date-based filename. A pattern such as billing-error-payment-step.png is easier to identify when attaching the file. Keep the real extension and verify the image before sending it.
Prepare a screenshot for a support ticket or upload
A useful attachment answers a question, not just “did the shortcut work?” Before capturing, decide four things: prove the relevant state; include enough interface to locate it; exclude private or unrelated information; and submit a file format the destination accepts.
For example, imagine a fictional checkout form showing error E204. A tight shot of the error may be sufficient. If the recipient also needs to know which checkout step produced it, add a second, wider context image. Two images are optional—not a requirement for every ticket. Label them in explanatory order, such as checkout-e204-01-context.png and checkout-e204-02-detail.png. Keep the actual file extension; renaming a HEIF file to .png does not convert it.
- Open each file and check the error text, necessary context, and private details at a readable size.
- Attach the file to the intended ticket or message. Add a short sentence explaining what the recipient should notice.
- Inspect the uploaded preview or reopen the attachment. Check that it is the latest version and remains legible after the destination resizes it.
If there is nothing to attach, check the Clipboard and the Screenshot app’s save location before taking another image. If the recipient needs selectable text or the original document, provide that approved source instead of forcing everything into a screenshot. If movement is essential, use a short Mac screen recording.
Use a privacy-first capture workflow

A screenshot freezes everything inside its boundary, including information you stopped noticing. Use this five-step preflight for client work, support tickets, documentation, and public posts:
- Clean the source. Close notifications, personal tabs, account menus, private messages, customer names, tokens, email addresses, and unrelated files.
- Choose the smallest boundary. Prefer a selection or window over the full screen unless the whole display is necessary evidence.
- Choose the destination. Use the Clipboard for one immediate paste; use a named file when review or approval is required.
- Inspect the actual output. Open or paste the capture at full size and check edges, menu bars, browser chrome, and reflections of hidden information in thumbnails or previews.
- Share through the approved channel. Confirm the recipient and attachment before sending, then retain or delete the file according to the applicable workflow.
Do not depend on a decorative rectangle drawn over sensitive text as permanent redaction. Prefer removing the information before capture or recapturing a smaller region. Inspect the actual shared image, not just the editable project.
Fix a Mac screenshot that did not work
No file appeared
First, paste into a blank note. If the image appears, the capture used a Clipboard route, such as adding Control or choosing Clipboard as the destination. If not, press Shift + Command + 5, open Options, and check the selected Save to destination. Search Finder for filenames beginning with “Screenshot” and sort by the most recent date.
The keyboard shortcut does nothing
Open System Settings > Keyboard > Keyboard Shortcuts > Screenshots and confirm the shortcut is enabled and not conflicting with another command. Apple’s shortcut troubleshooting guide notes that a warning icon can indicate another app already uses the combination. As a fallback, use Spotlight to open the Screenshot app or use Preview’s menu command.
A specific app shows blank or protected content
Some apps do not allow screenshots of particular windows or protected media. Confirm that an ordinary desktop region can be captured, then respect the app’s restriction rather than trying to bypass it.
A third-party recording app cannot see the screen
Open System Settings > Privacy & Security > Screen & System Audio Recording and review whether that app or website is allowed. Grant access only when you trust the service and understand how it handles captured information. Apple explains this permission in its screen-recording privacy guide.
The task is complete when you can open the intended image file or paste the Clipboard result, every necessary detail is readable, and no unrelated private information appears inside the capture.