A controlled domain-transfer runbook that protects DNS, website, email, and account security before and after the registrar handoff.
A domain transfer can finish successfully while the website disappears and company email stops arriving. The transfer did not erase either service. The old registrar was also providing DNS, and that dependency was never moved.
To transfer a domain safely, first confirm that it is eligible, preserve or migrate its DNS, unlock it, obtain the authorization code, start the request at the new registrar, approve the transfer, and verify every dependent service before closing the old account. For many generic top-level domains, the registry portion can take up to five calendar days unless the losing registrar approves it sooner. Country-code domains can follow different rules.
First, separate the domain from the services behind it
A registrar transfer changes the company responsible for the domain registration. It does not move website files, databases, mailboxes, or an online store. It also does not inherently replace the domain’s authoritative nameservers.
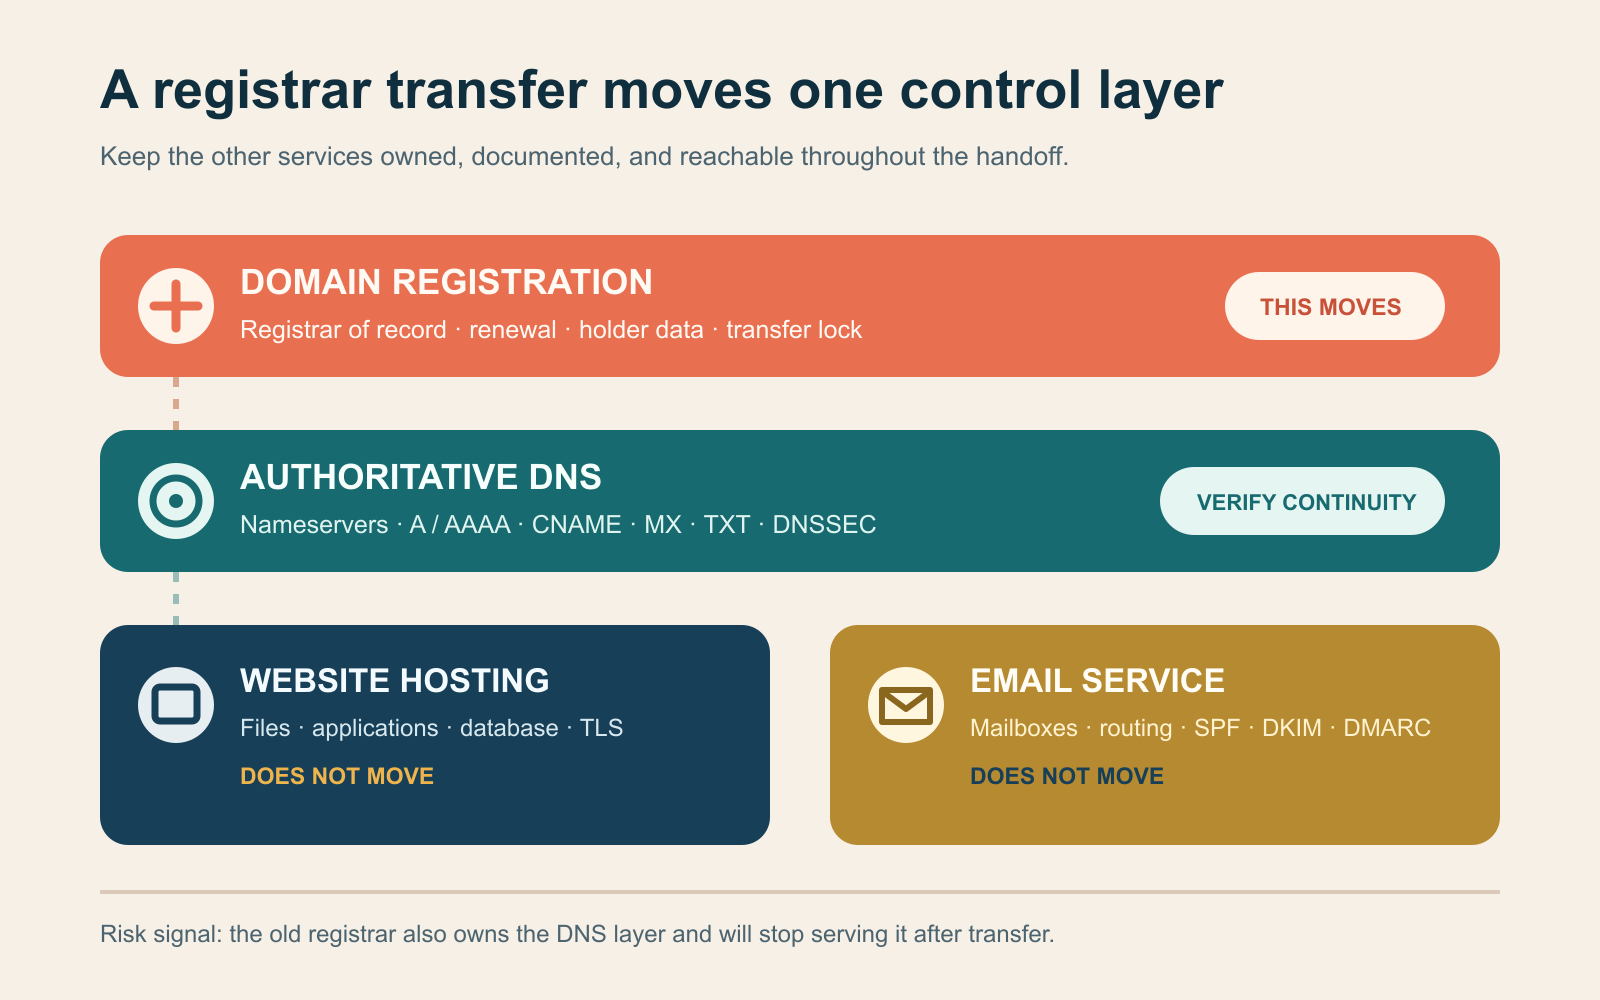
This distinction determines whether the move is low risk. If a third-party DNS provider or web host runs the nameservers, they can usually remain in place. If the old registrar’s default nameservers host the zone, that registrar may stop answering for it after the domain leaves. Namecheap’s current transfer documentation, for example, says nameservers remain unchanged but warns that an old registrar may delete a zone hosted on its default DNS after transfer.
Do not assume the new registrar has the same model. Some providers require their own DNS. Cloudflare’s registrar transfer guide requires a domain to be active on Cloudflare nameservers before the registration transfer can begin. Read the gaining registrar’s TLD and nameserver requirements before changing anything.
Build a transfer readiness record
Make one short record for the domain. It becomes both the preflight check and the handoff log.
| Record | Ready condition | If it is not ready |
|---|---|---|
| Current registrar and status | The registrar is expected and no transfer-blocking status is present | Investigate the status before paying for a transfer |
| Registration and last-transfer dates | The domain is outside applicable waiting periods | Record the first eligible date |
| Registrant contact | The authorized holder can receive security messages | Ask the old registrar how to restore access without accidentally starting a new lock |
| Expiration | There is enough time to resolve a delay | Renew or get registrar-specific advice instead of attempting a last-minute move |
| Nameservers and DNS host | The DNS service will remain active after transfer | Migrate the zone and verify it before unlocking the domain |
| Website and email targets | Important A, AAAA, CNAME, MX, TXT, CAA, and SRV records are saved | Export or copy the zone and identify its service owners |
| DNSSEC | The current DS record and key plan match the intended DNS provider | Use the DNS provider’s migration runbook; do not leave a stale DS record |
| New registrar | It supports the TLD, nameserver plan, payment method, and account owner | Choose a compatible registrar or revise the DNS plan |
Use the official ICANN Registration Data Lookup for supported gTLD registration data and status codes. A status of clientTransferProhibited usually means the normal registrar lock is active. serverTransferProhibited is a registry-level restriction that the registrar may need to resolve. ICANN’s EPP status reference explains both.
Confirm that the domain is eligible
For domains covered by ICANN’s gTLD transfer policy, the losing registrar may deny a request during the first 60 days after initial registration or during the first 60 days after a previous inter-registrar transfer. A 60-day lock can also follow a change of registrant unless the registrar offered an advance opt-out and the holder used it. The current ICANN Transfer Policy defines these conditions and limited denial reasons.
That creates an important sequence rule: do not casually change the registrant’s name, organization, or email immediately before moving registrars. If the contact inbox is inaccessible, resolve it with the current registrar and ask how its change-of-registrant lock applies. Also check the gaining registrar’s rules for the exact TLD. A .uk, .ca, or another country-code domain may use a different authorization method, timeline, fee, or eligibility test.
Preserve DNS before you unlock the domain
Record the current nameservers and export the complete DNS zone if the interface permits it. At minimum, capture records for the apex domain, www, mail exchangers, email authentication, verification tokens, service subdomains, certificate authority restrictions, and any custom applications.
If the existing DNS host will continue serving the zone and the gaining registrar permits those nameservers, leave DNS alone. If the old registrar will stop hosting the zone, create an equivalent zone at a continuing provider, compare every material record, change the nameservers, and wait until public resolvers return the new authoritative answers. Only then begin the registration transfer.
DNSSEC needs its own plan. Keeping the same authoritative DNS service normally means keeping its working DNSSEC configuration. Changing DNS providers can require coordinated DS and key changes. Cloudflare’s provider-specific workflow tells customers to disable DNSSEC before switching nameservers and wait for the old DS state to clear; use the instructions for the providers actually involved rather than applying that step universally.
Transfer the domain in seven controlled steps
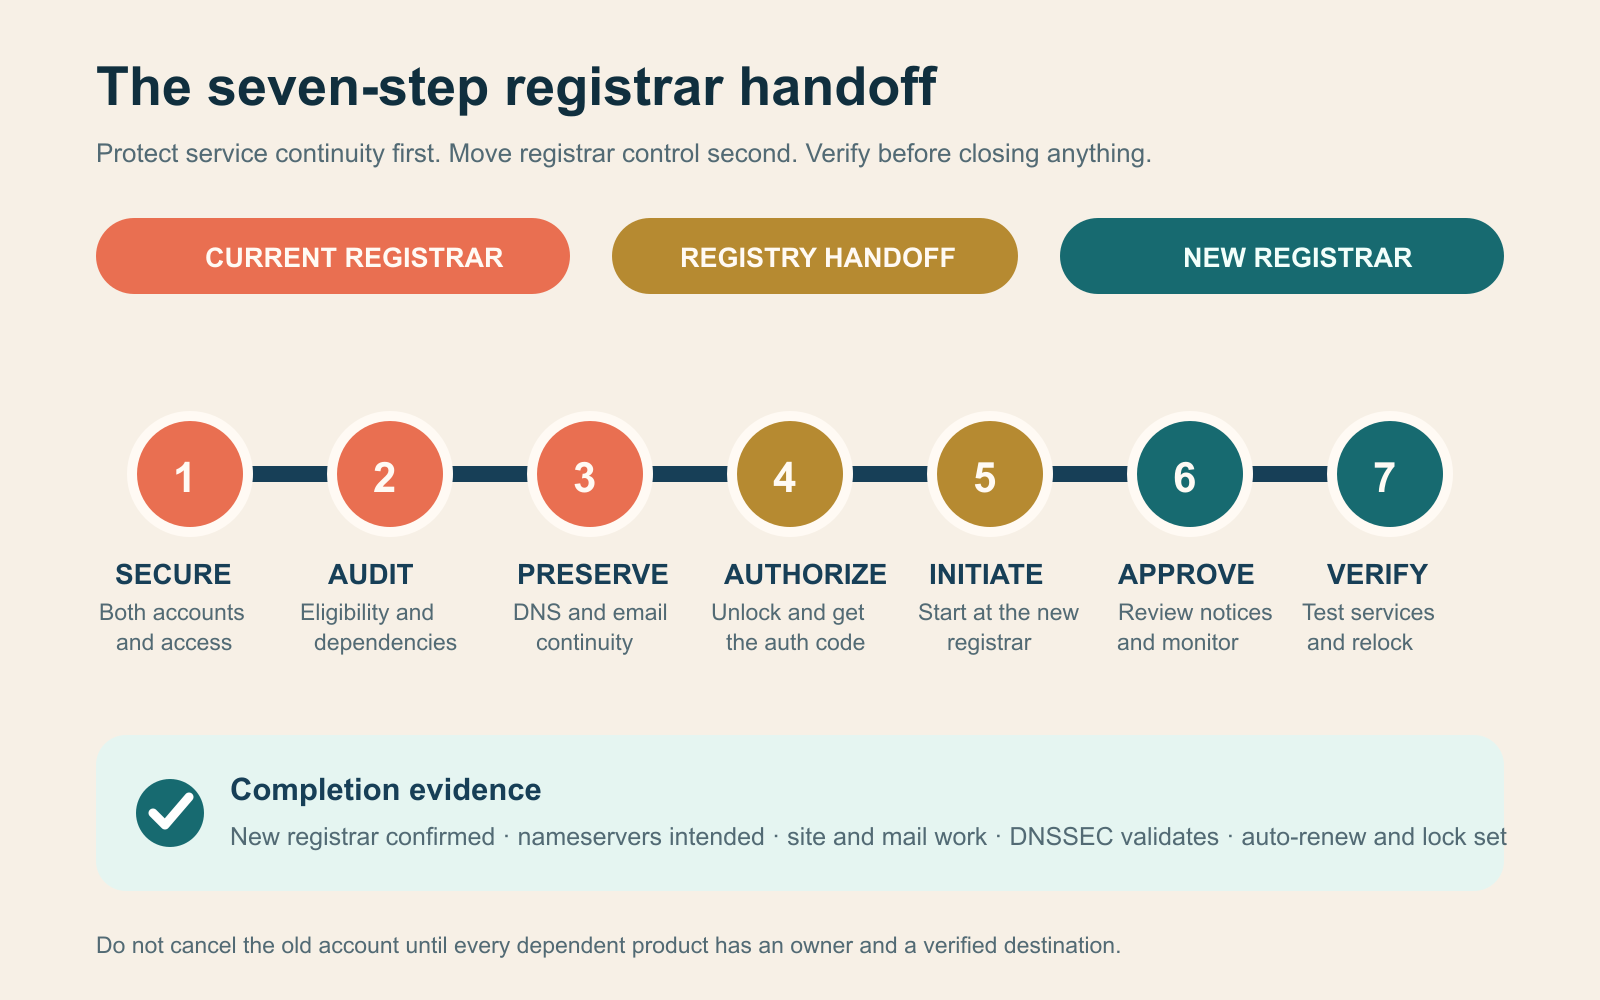
- Secure both accounts. Turn on multifactor authentication, confirm recovery methods, and remove access that no longer belongs to the organization.
- Complete the readiness record. Verify TLD support, waiting periods, expiration, registrant access, nameservers, DNS records, DNSSEC, and the intended account owner.
- Make DNS independent if necessary. Move and verify the zone before starting the transfer when the old registrar’s DNS will not continue.
- Unlock and request the auth code. Remove the transfer lock and obtain the domain-specific AuthInfo, EPP, or transfer code. Treat it like a credential and send it only to the gaining registrar. ICANN’s registrant transfer guidance says registrars must provide the code within five calendar days when they do not provide self-service generation.
- Start at the gaining registrar. Enter only the registered domain name, provide the auth code, confirm contact information, accept the terms, and pay any stated transfer charge.
- Approve and monitor. Review notices from both registrars. Approve the outgoing request in the losing registrar’s dashboard if that option is available. Under ICANN’s policy, a gTLD transfer normally proceeds by default if the losing registrar does not reject it within five calendar days.
- Verify, then relock. Confirm the new registrar of record, intended expiration date, nameservers, website, email, certificate behavior, DNSSEC state, auto-renewal, billing, contacts, and access. Re-enable the transfer lock only after the checks pass.
A holder-authorized gTLD transfer under the ICANN policy adds one year to the existing registration term, subject to the ten-year maximum. Do not assume every country-code domain follows that rule. Also keep the old account open until you confirm that no DNS, hosting, email, privacy, or forwarding product still depends on it.
Verify services, not just the success email
The completion notice proves that registrar control changed. It does not prove that customers can use the site. Test from outside your usual signed-in environment:
- Open the root domain and important subdomains over HTTPS.
- Send mail into and out of at least one domain mailbox, then confirm SPF, DKIM, and DMARC records remain present.
- Confirm public nameserver and DNS answers match the readiness record.
- Check that the new registrar shows the correct holder details, expiration, auto-renewal, payment method, and transfer lock.
- If DNSSEC is enabled, verify that validation succeeds rather than merely seeing a toggle marked on.
Record the check time and result beside each dependency. That creates a defensible handoff instead of relying on a green banner in one dashboard.
Use the failure signal to choose the fix
| Signal | Likely meaning | Next action |
|---|---|---|
clientTransferProhibited |
The registrar lock remains active | Unlock it in the old account or ask the registrar to remove it |
serverTransferProhibited |
A registry-level restriction, dispute, or special lock exists | Ask the current registrar to identify and resolve the registry restriction |
pendingTransfer |
The registry received a transfer request | Monitor notices and approval options; investigate only if the stated window passes |
| Invalid or expired auth code | The credential is mistyped, stale, or regenerated | Request a fresh code and restart through the gaining registrar |
| Website and mail fail after completion | The old DNS zone stopped serving or records changed | Restore the intended zone at a working DNS provider and correct the nameserver delegation |
| The transfer is rejected without a clear dashboard reason | A waiting period, contact lock, TLD rule, payment issue, or restricted status may apply | Get the exact rejection reason from both registrars; use the gaining registrar to trace the request |
Provider details can add another constraint. Cloudflare’s transfer troubleshooting guide, for example, identifies active DNSSEC, a stale lock, an invalid auth code, payment failure, and unsupported TLD conditions in its own flow. Treat the specific error as evidence; repeatedly submitting the same request does not remove a policy lock.
Decide whether you need a transfer at all
If the goal is only to connect a domain to a new website, store, or email provider, change the required DNS records or nameservers. The registrar can stay where it is. Transfer the registration when you want a different renewal provider, account owner, security model, supported TLD set, or domain-management workflow.
Your next action should therefore be a dependency check, not an unlock click: write down the registrar, nameservers, DNS host, website host, email provider, DNSSEC state, expiration, and authorized contact. Once every line has an owner and a verified destination, the seven-step handoff can begin.