
Move beyond a one-time color mix: specify the brown, test weighed variants, approve the cured sample under controlled light, scale the formula, and retain production evidence.
This guide begins after “I mixed a brown I like.” Production starts when that brown must appear again next week, on another batch, in a different shop, or after a supplier changes lots. A recipe can fail even when copied exactly because pigment strength, binder, substrate, film thickness, drying, gloss, lighting, and measurement conditions all influence the result.
To produce brown color consistently, first approve a physical master swatch or color specification under defined lighting. Use compatible materials from one system, weigh a small pilot formula, and create a ladder that changes only one component at a time. Apply every sample to the real substrate at the real thickness, let it reach the specified dry or cured state, then compare lightness, redness or greenness, and yellowness or blueness under the agreed light sources. Scale the accepted mass percentages—not spoonfuls—while preserving material lots, mixing order, equipment, time, temperature, finish, and a retained batch sample.
This page solves repeatability—not the first mix
ToolMerit already has two simpler answers. Use the page that matches the job:
| Your question | Use this route | Outcome |
|---|---|---|
| Which colors can make brown paint? | What Colors Make Brown? | Choose orange–blue, red–green, or yellow–violet and learn basic correction |
| How do I make brown in paint, digital design, or icing? | How to Make Brown | Choose a medium-specific starting recipe |
| How do I reproduce an approved brown across batches or vendors? | This production workflow | Create a measurable target, process window, acceptance gate, and traceable batch |
The basic color idea remains useful: a warm orange-biased mixture can be neutralized toward brown with blue, and other complementary routes can work. But there is no universal equal-parts production formula. Golden Artist Colors defines tinting strength as the effectiveness with which an amount of colorant changes another material; two blues at the same weight can therefore move the mixture by very different amounts. Product identity belongs in the formula.
Write the target specification before mixing
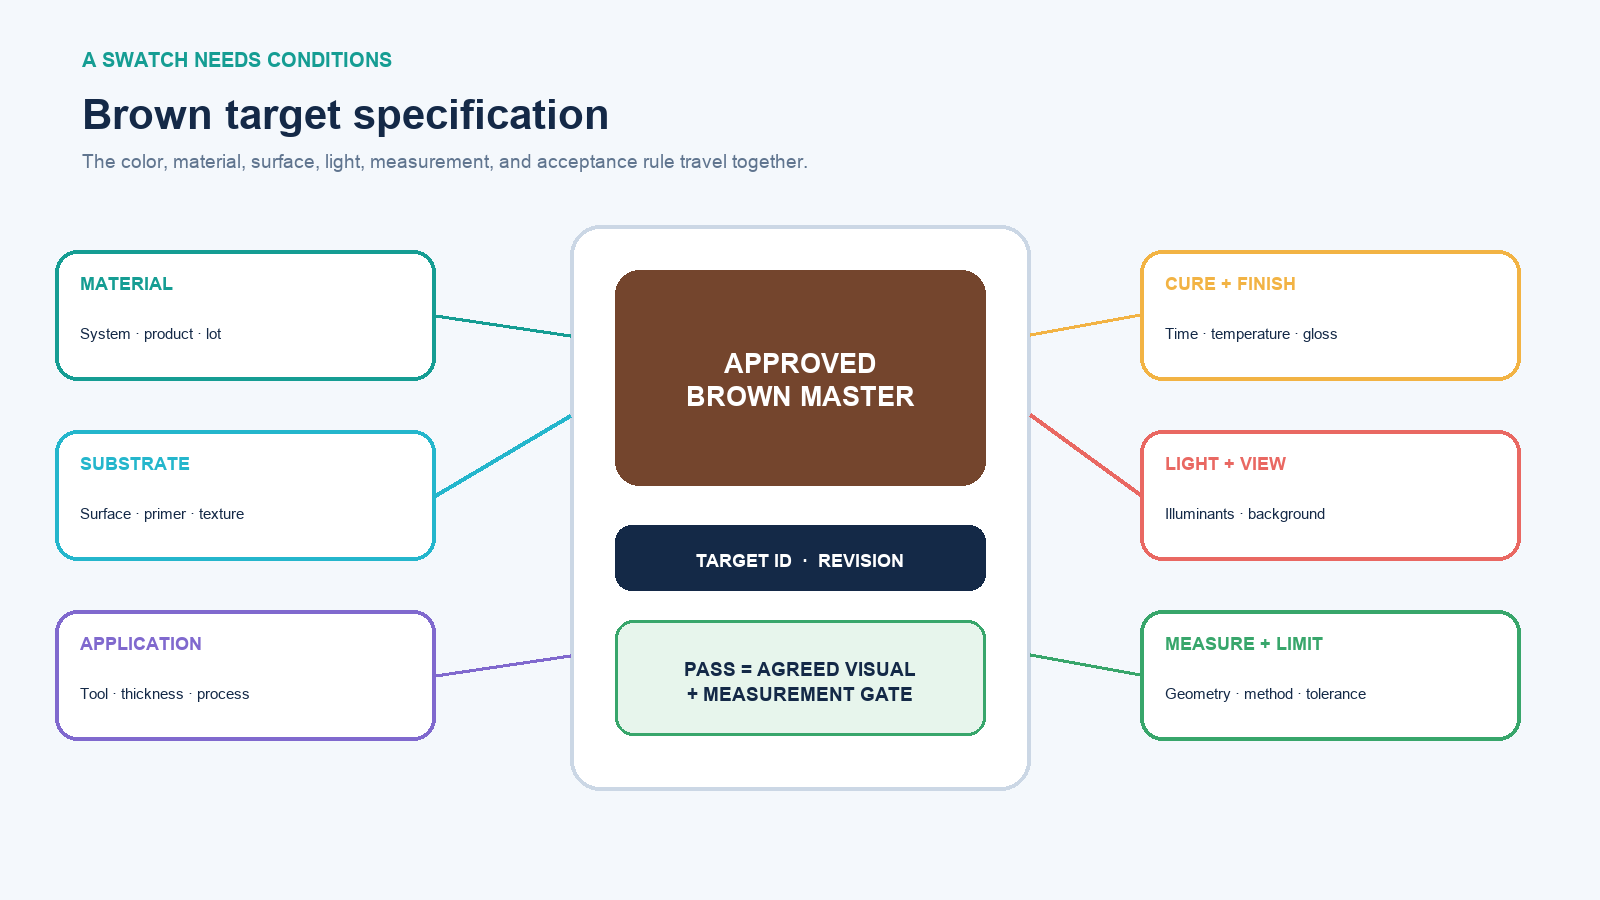
“Medium brown” is a description, not an acceptance standard. Create a target card with these fields:
- Reference: controlled physical master, approved production sample, spectral data, or declared color coordinates—not an unprofiled phone photo.
- Material system: paint, coating, ink, plastic, textile, paper, or digital output; manufacturer and exact product family.
- Substrate and preparation: material, supplier, color, sealing, primer, surface texture, and cleanliness.
- Application: tool or process, wet or dry thickness, passes, pressure, speed, dilution, coverage, and orientation where relevant.
- Condition: dry or cure time, temperature, humidity, and conditioning before inspection.
- Appearance: gloss or sheen, texture, opacity, transparency, and whether metallic, pearlescent, fluorescent, or directional effects exist.
- Viewing and measurement: illuminants, booth, background, observer conditions, instrument geometry, aperture, calibration, averaging, and color space.
- Acceptance: buyer-approved visual standard, color-difference method and tolerance, plus any separate gloss, opacity, or texture limits.
ASTM D2244-25 says purchaser and seller should agree on permissible color tolerance and the calculation procedure; it also warns that gloss and texture can affect whether an instrumental difference corresponds to commercial acceptance. Do not invent a universal “Delta E under 2” rule. A tolerance appropriate for one packaging material, coating, or placement may be wrong for another.
Freeze the material system and safety controls
Record exact product names, product or pigment identifiers, lot numbers, binder or base, colorants, medium, thinner, additives, and intended use. Use only combinations the manufacturers say are compatible. A brown made by mixing two artist acrylics is not a transferable formula for wall paint, printing ink, resin, textile dye, plastic masterbatch, food, or cosmetics.
Masstone, undertone, opacity, particle behavior, and tinting strength can differ even between colors with similar names. Golden’s technical glossary defines undertone as the color revealed by a thin scrape over white; its mixing poster deliberately shows masstone, undertone, and controlled tints because one view does not describe the material completely.
Follow the current label and safety data sheet for every component. Control dust, vapors, ignition sources, ventilation, skin and eye exposure, spills, waste, and protective equipment as specified for the workplace and process. OSHA’s hazard-communication framework requires chemical identities and hazards to be communicated through labels, safety data sheets, and training in covered workplaces. Do not weigh dry industrial pigments on food equipment or assume “natural color” means low hazard.
Build a one-variable pilot ladder
Start with a compatible warm base premix and the neutralizing colorant selected in the simple mixing stage. Make a ladder of small samples in which only the neutralizer changes. This fictional 50-gram series illustrates a 1-percentage-point step:
| Sample | Warm base premix | Neutralizer | Neutralizer fraction |
|---|---|---|---|
| B-01 | 49.5 g | 0.5 g | 1% |
| B-02 | 49.0 g | 1.0 g | 2% |
| B-03 | 48.5 g | 1.5 g | 3% |
| B-04 | 48.0 g | 2.0 g | 4% |
| B-05 | 47.5 g | 2.5 g | 5% |
These are test increments, not a universal recipe. Use a scale with suitable capacity and resolution, tare the container, and record actual mass rather than the intended mass. Add materials in the same order, scrape the vessel, and hold mixing tool, speed, time, temperature, rest, and deaeration constant. If B-03 and B-04 bracket the target, run a narrower ladder between them instead of guessing with repeated dabs.
Apply every candidate to the specified substrate using the production method and thickness. Label the back or an uncoated margin with sample ID, formula revision, date, substrate lot, applicator, and cure condition. Wet color is not the release color. Allow the stated dry or cure interval, then measure and view the sample—not the mixing cup.
Measure the difference and inspect its direction
A single color-difference number reports magnitude, but production correction needs direction. In a CIELAB workflow, compare at least:
- ΔL*: whether the batch is lighter or darker than the target;
- Δa*: whether it has shifted toward red or green;
- Δb*: whether it has shifted toward yellow or blue;
- agreed ΔE method: the combined difference calculated with the same formula, settings, instrument conditions, and target used to set the tolerance.
ASTM D2244-25 covers several color-difference systems and recommends CIEDE2000 for small differences in many industrial applications. The same standard cautions that results from different color scales are not interchangeable by one universal conversion factor. Record the formula name—not just “Delta E”—and keep the directional components.
Take measurements at representative positions and use the sampling approach agreed for the material. Nonuniform, textured, curved, translucent, glossy, or patterned surfaces may require multiple readings, a suitable aperture or geometry, and a separate appearance method. ASTM E1345-24 specifically addresses using multiple measurements to reduce variability. Instrument calibration and sample presentation belong in the batch record.
Do not let the instrument become the only observer. ASTM D1729-22 describes standardized visual appraisal as important even when instruments are used, and highlights controlled illumination and observer capability. Compare target and batch side by side with consistent orientation and background; avoid judging from memory.
Test the match under every important light
Two browns can match under one lamp and separate under another because their spectral profiles differ. NIST defines this as metamerism. Test the pair under the illuminants that represent the use case: representative daylight, retail or office lighting, warm residential light, or a buyer-specified booth sequence. The CIE formally defines standard illuminants including D65, D50, and A; name the illuminant rather than writing “normal light.”
A multi-light failure is not always repaired by pushing the batch toward the target under the first lamp. The pigments or colorants may need to change so the spectral behavior becomes closer. ASTM D4086 addresses visual evaluation of metamerism, while D2244 notes that daylight-derived tolerance equations may require visual confirmation under other illuminants.
Also isolate appearance effects. Benjamin Moore’s color-match guidance recommends comparing dried samples, using a sealed white card, controlling the light, and reducing gloss influence with the viewing angle. In production, match substrate, texture, gloss, film build, and cure before concluding that the colorant formula alone is wrong.
Scale the accepted formula by mass
Convert each component to a mass fraction:
component fraction = component mass ÷ pilot total mass
production mass = component fraction × target batch mass
Suppose an approved 125-gram pilot contains 103.75 g warm base premix, 8.75 g neutralizer, 7.50 g compatible opacity component, and 5.00 g compatible medium. Its fractions are 83%, 7%, 6%, and 4%. For a 2.5-kilogram batch, the scale factor is 2,500 ÷ 125 = 20:
| Component | Pilot | Fraction | 2.5 kg target |
|---|---|---|---|
| Warm base premix | 103.75 g | 83% | 2,075 g |
| Neutralizer | 8.75 g | 7% | 175 g |
| Opacity component | 7.50 g | 6% | 150 g |
| Compatible medium | 5.00 g | 4% | 100 g |
| Total | 125.00 g | 100% | 2,500 g |
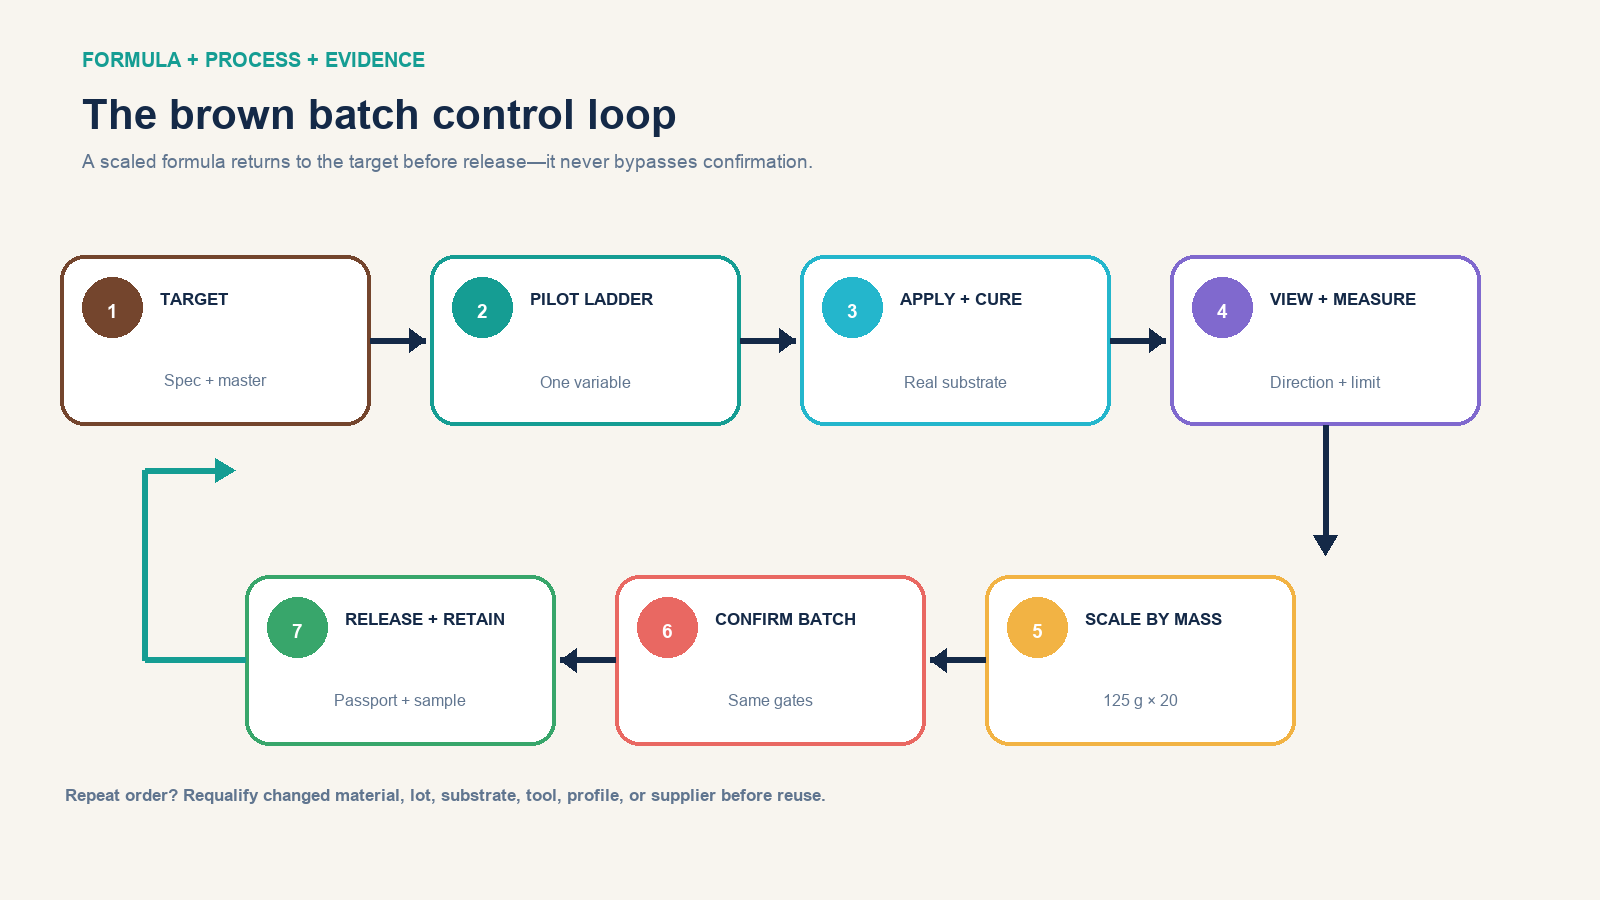
A larger vessel changes mixing geometry, shear, heat, incorporation time, wall losses, and settling behavior. Reproduce addition order and process parameters, but treat the scale-up as a new confirmation batch. Draw a production sample, cure it, evaluate it against the target, and release only after it passes the agreed gates. If the scale cannot accurately resolve a small component, prepare an approved concentrate or use suitable dosing equipment rather than rounding it away.
Keep screen, print, and physical brown separate
A screen does not prove a paint or print match. W3C’s CSS Color specification defines the keyword brown as sRGB #a52a2a, but that is one standardized screen coordinate—not the definition of brown materials. If the output is digital, specify the color space and coordinates, embed or preserve the required profile, test accessible contrast in the actual interface, and review on the target display class.
For managed print, define the print condition, substrate, ink set, rendering intent, proof method, and viewing light. The International Color Consortium’s profile architecture connects device encodings through defined profiles; a CMYK recipe without its profile and printing condition is incomplete. A monitor HEX value can be a communication aid, but the contract target for critical physical production should be a controlled proof, master, spectral specification, or buyer-approved sample with tolerance.
The broader primary-colors guide explains why RGB light, CMY/CMYK print, and traditional paint models do not share one mixing rule. Preserve that separation throughout the workflow.
Correct one cause—not every visible symptom
| Observed difference | Check before changing formula | Controlled next experiment |
|---|---|---|
| Too light or too dark | Thickness, opacity, substrate, gloss, full cure, measurement geometry | Change only the lightness-controlling component in a small ladder |
| Too red or too green | Correct target and instrument sign, pigment lot, contamination | Use the recorded Δa* direction to design one-component steps |
| Too yellow or too blue | Lighting, target orientation, lot identity, undertone | Use the recorded Δb* direction; do not simultaneously alter black or white |
| Matches wet but not dry | Cure time, temperature, binder, film build, substrate absorption | Approve dry-state samples only and standardize application |
| Matches in one light only | Metamerism and illuminant identity | Reformulate with closer spectral behavior; do not chase one lamp |
| Instrument passes, people reject | Gloss, texture, opacity, geometry, directional effects, tolerance model | Separate color and appearance criteria, then rerun both gates |
Make a new sample ID for every revision. Never “fix” a released batch in the record by replacing the old formula. The failure history often explains supplier drift or reveals which component controls the target most strongly.
Release the batch with a passport
The batch passport should include target ID and revision; product, pigment, binder, additive, substrate, and lot identities; actual weighed masses; vessel and equipment; addition order; mixing speed and time; temperature and humidity; application and thickness; cure; sample positions; instrument, calibration and settings; illuminants; measurements; visual reviewers; deviation approval; production quantity; release date; and destination.
Retain the approved target, production drawdown, representative material sample where practical, measurement file, and formula under the agreed retention conditions. Record shelf life and storage environment. When a component, lot, substrate, tool, profile, or supplier changes, run a controlled requalification instead of assuming the old percentages guarantee the old brown.
The finished result is more than “83% + 7% + 6% + 4%.” It is that formula made from named lots, mixed by a defined process, applied to a defined surface, cured to a defined state, and accepted visually and instrumentally under declared conditions. That complete package—not the color name—is what lets the next batch reproduce the brown.